[T] Creating your Serverless Python Development Environment the Easy Way on Cloud9 (Windows, Mac, and Linux)
Setting up your serverless development environment doesn’t have to involve tears and lots of swear words.
Want to find out who your real programming friends are? Ask them to come over and help you setup your development environment.
I think it’s fair to say that the majority of would-be developers get demotivated at the “setting up your development environment” stage because it can often feel like throwing yourself into the deep end without a life jacket. It often comes riddled with a lot of complicated configuration that, in addition to being mostly ignored by whatever book or tutorial you’re following, has little do with actually learning to program (what are environmental variables? What is the PATH? Why is python not found? Why wont my code just run damnit!).
Today we are going to be setting up our serverless development environment, but we’re going to reduce the amount of tears and bloodshed required by doing it “in the cloud” (works with Windows, Mac, Linux, and according to this article iPadOS).
Not sure what serverless is or how it can help you go from python beginner to job-ready? Check out my what is serverless video for a high-level overview to help get you started!
Cloud9 to Save the Day
If you’ve done any previous python programming, you’ve probably gone through the pain of installing and setting up python on your own computer. You maybe had to update an “environmental variable” or two, and were probably either running it by pressing the green play button in your IDE or typing python myprogram.py in the command prompt / terminal.
Today, we are going to be using an AWS service called Cloud9 to create a development environment “in the cloud”.
“In the cloud” is a common marketing buzzword that gets liberally thrown around, but what it usually boils down to in non-fluff terms is: we’ll be renting a linux server computer from Amazon and connecting to it through a web browser (such as Chrome, Firefox, Safari, etc). Your python program files (main.py) will be stored on the server, and when you run your python program it will actually be running your program on the server computer. Nothing is stored on your personal computer.
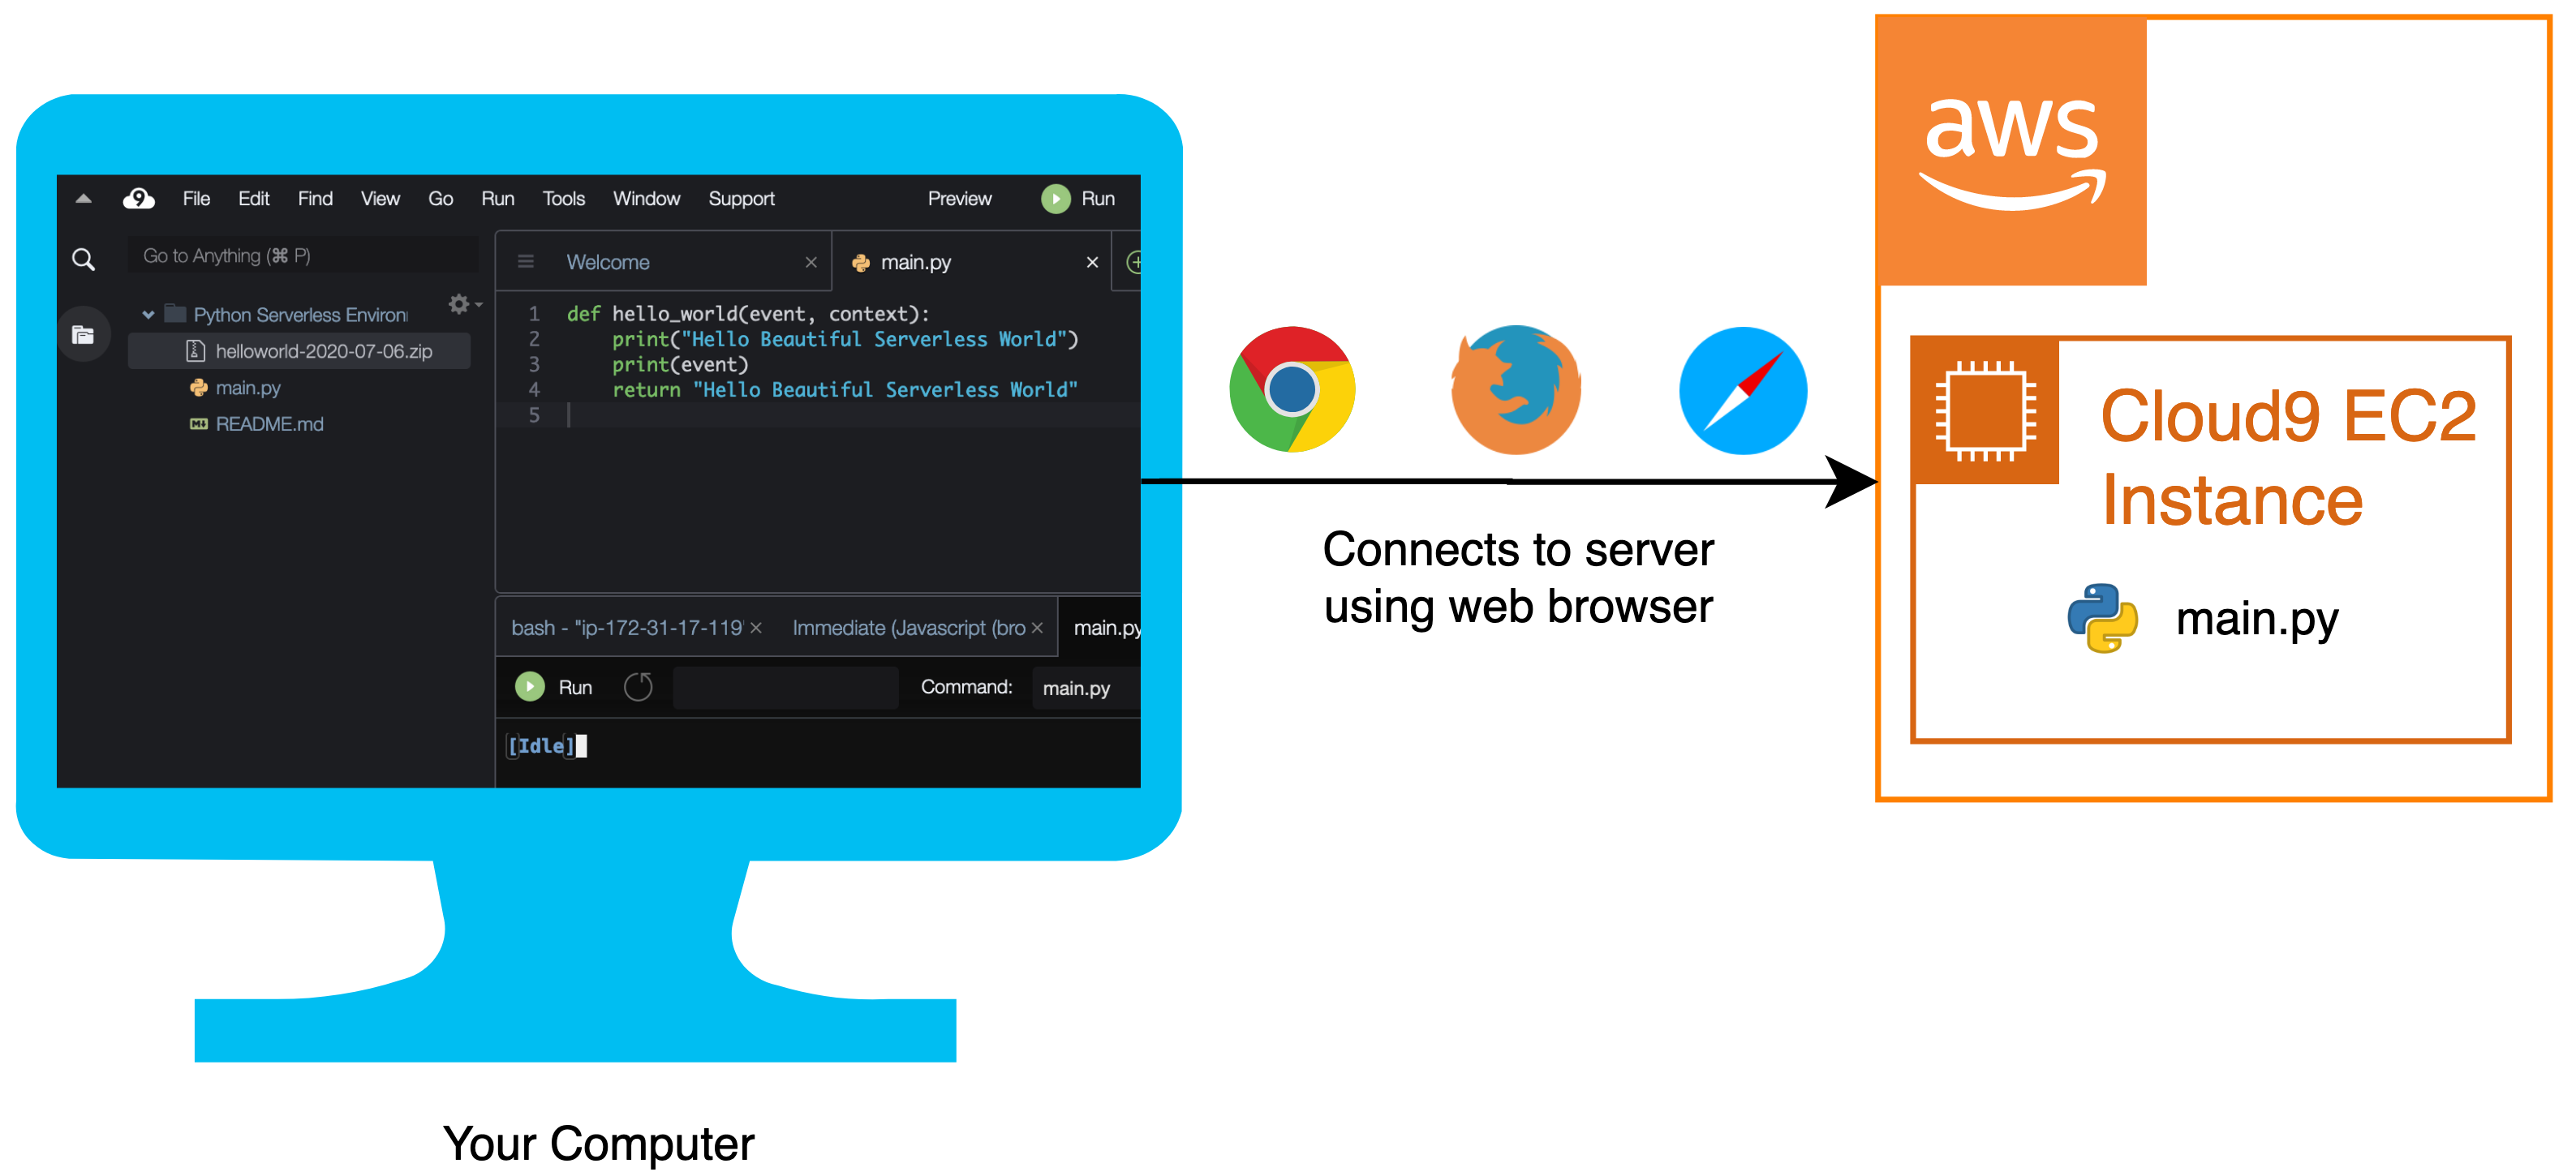
This may start to sound complicated, but as you’ll see in a minute, AWS makes this extremely easy for us!
Creating Your C9 Instance
After signing into AWS with our developer IAM account, the first thing that we’re going to want to do is navigate to Services > Cloud9 and click the orange Create environment button in the upper right-hand corner.


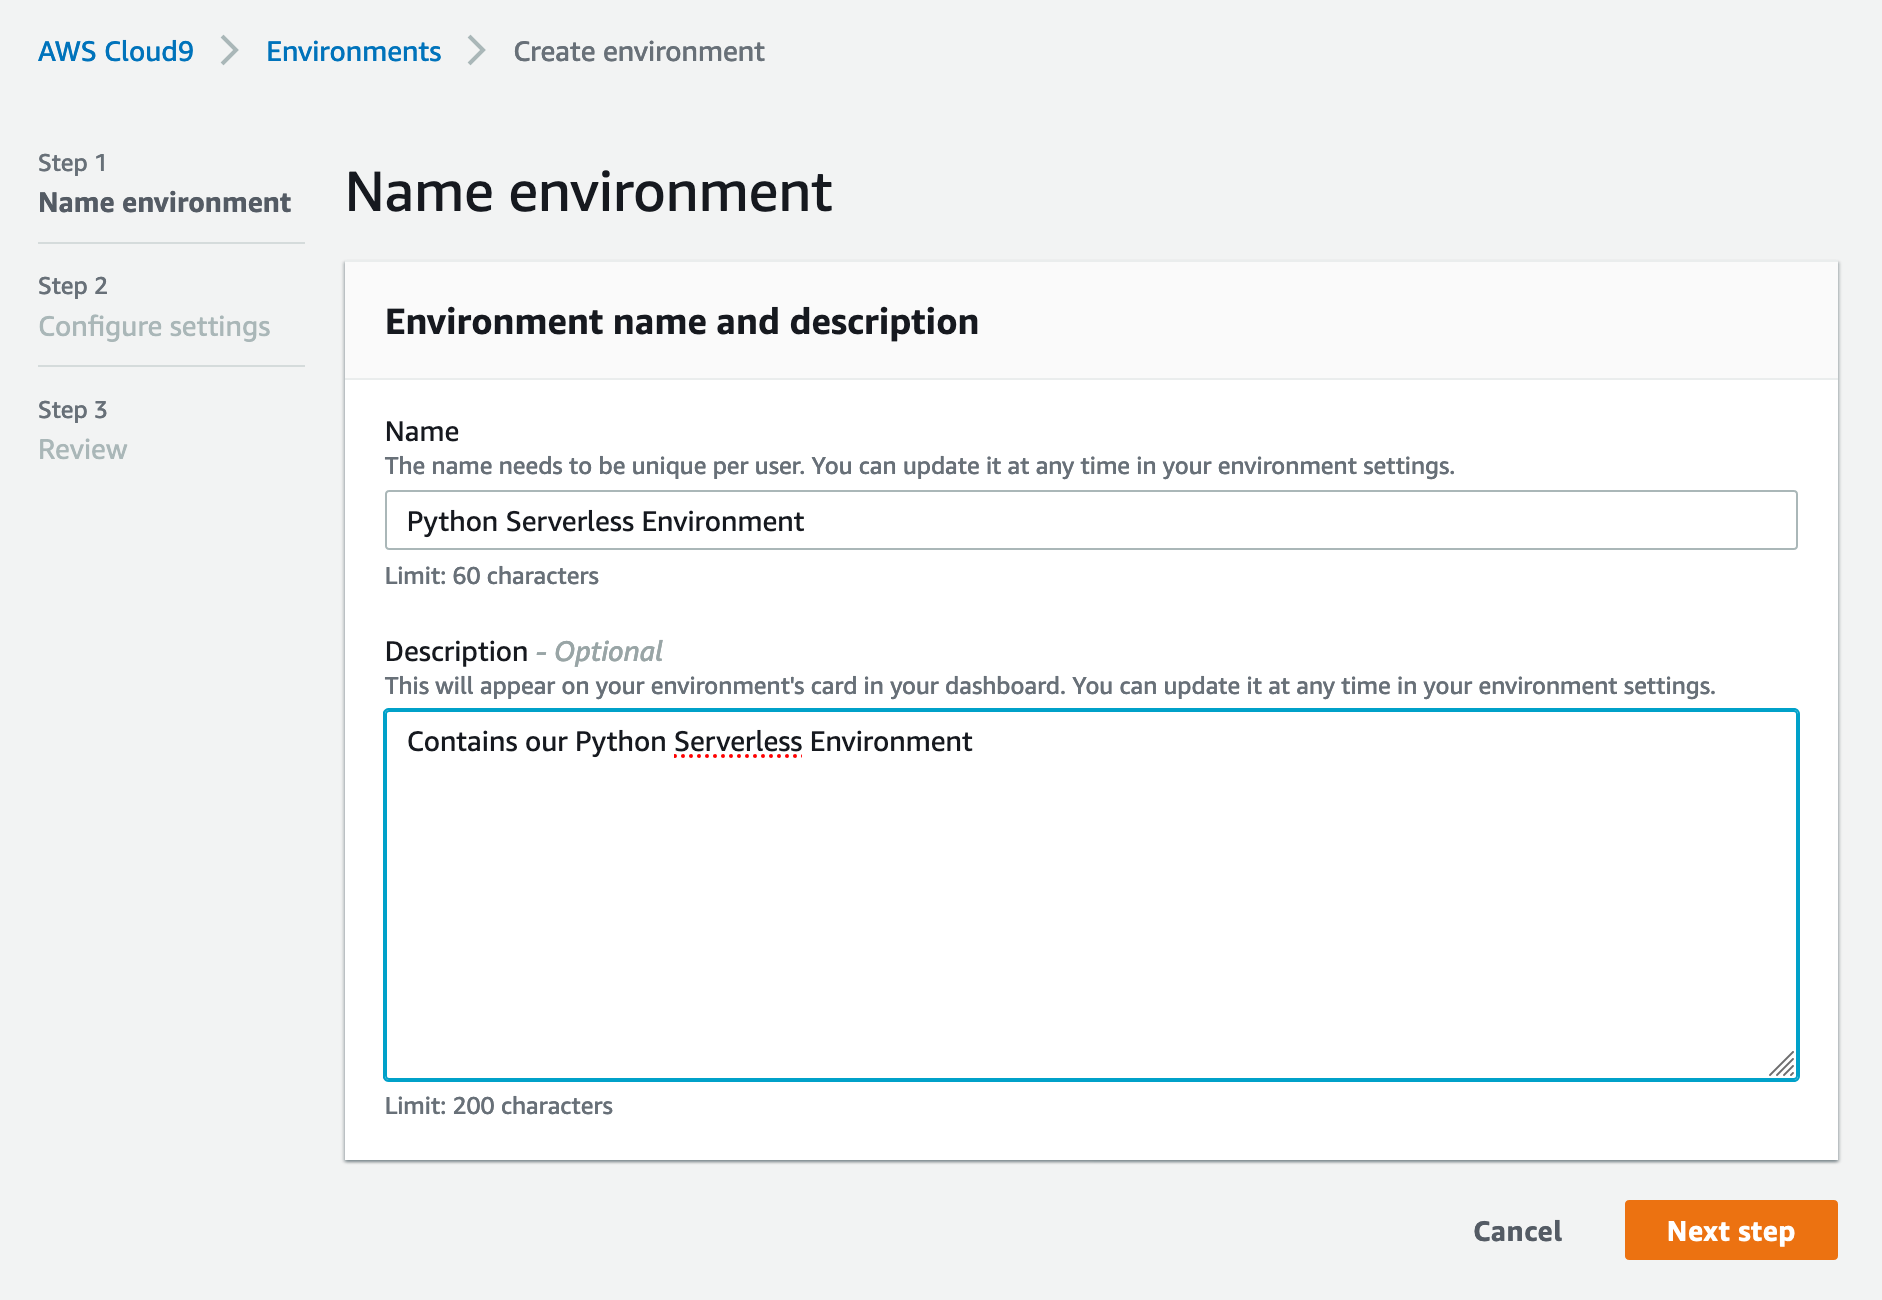
Next were going to name this environment Python Serverless Environment
We are going to keep the default configuration settings of a t2.micro instance which should be plenty for the majority of our tutorials (and is free for the first 12 months, see below for more information)
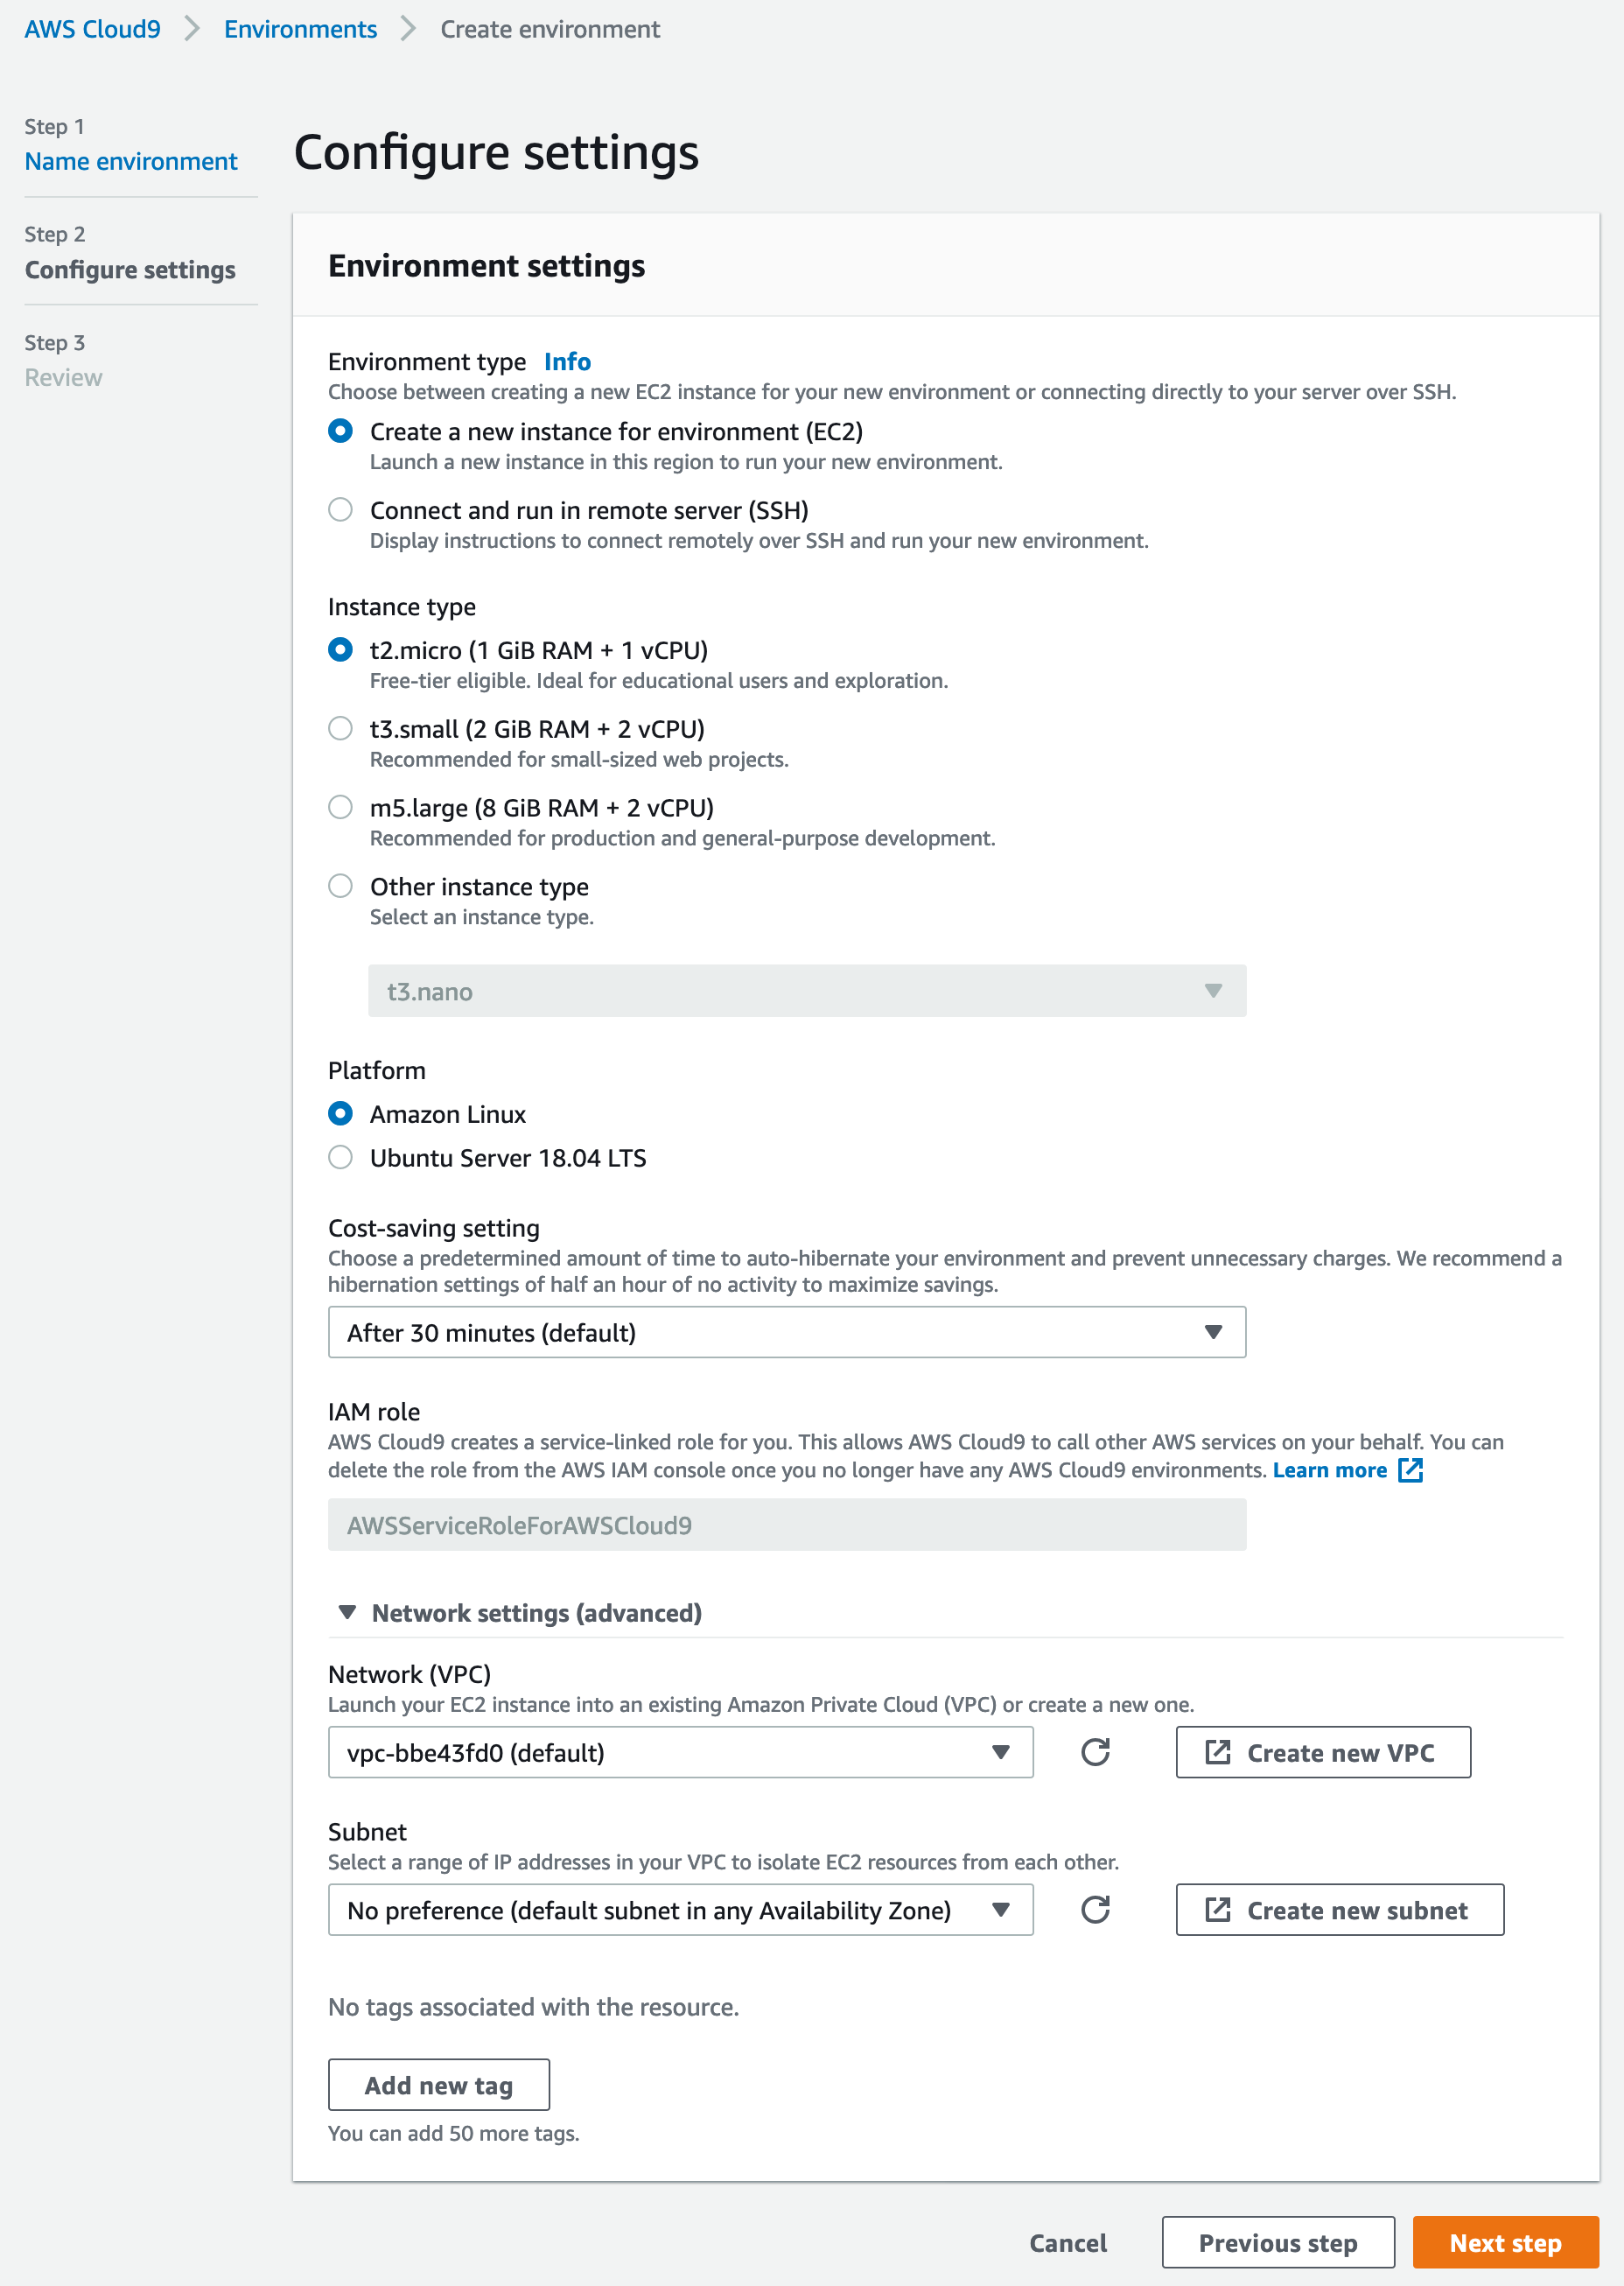
And finally we are going to press the orange Create Environment button. This may take a couple of minutes as AWS gets everything setup

Hello World (Old Edition)
It wouldn’t be a setup tutorial without a “Hello World” sprinkled in there somewhere, so first we are going to create a new file by Right Clicking on our Python Serverless folder.
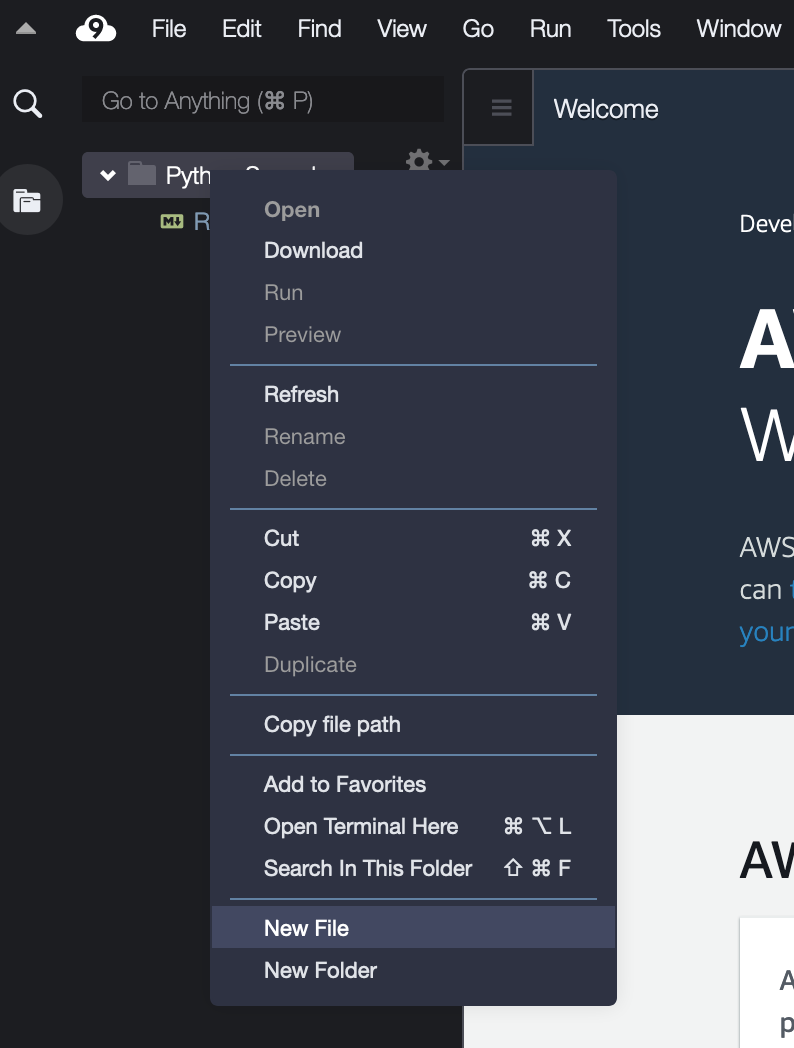
Name it main.py and double click on it

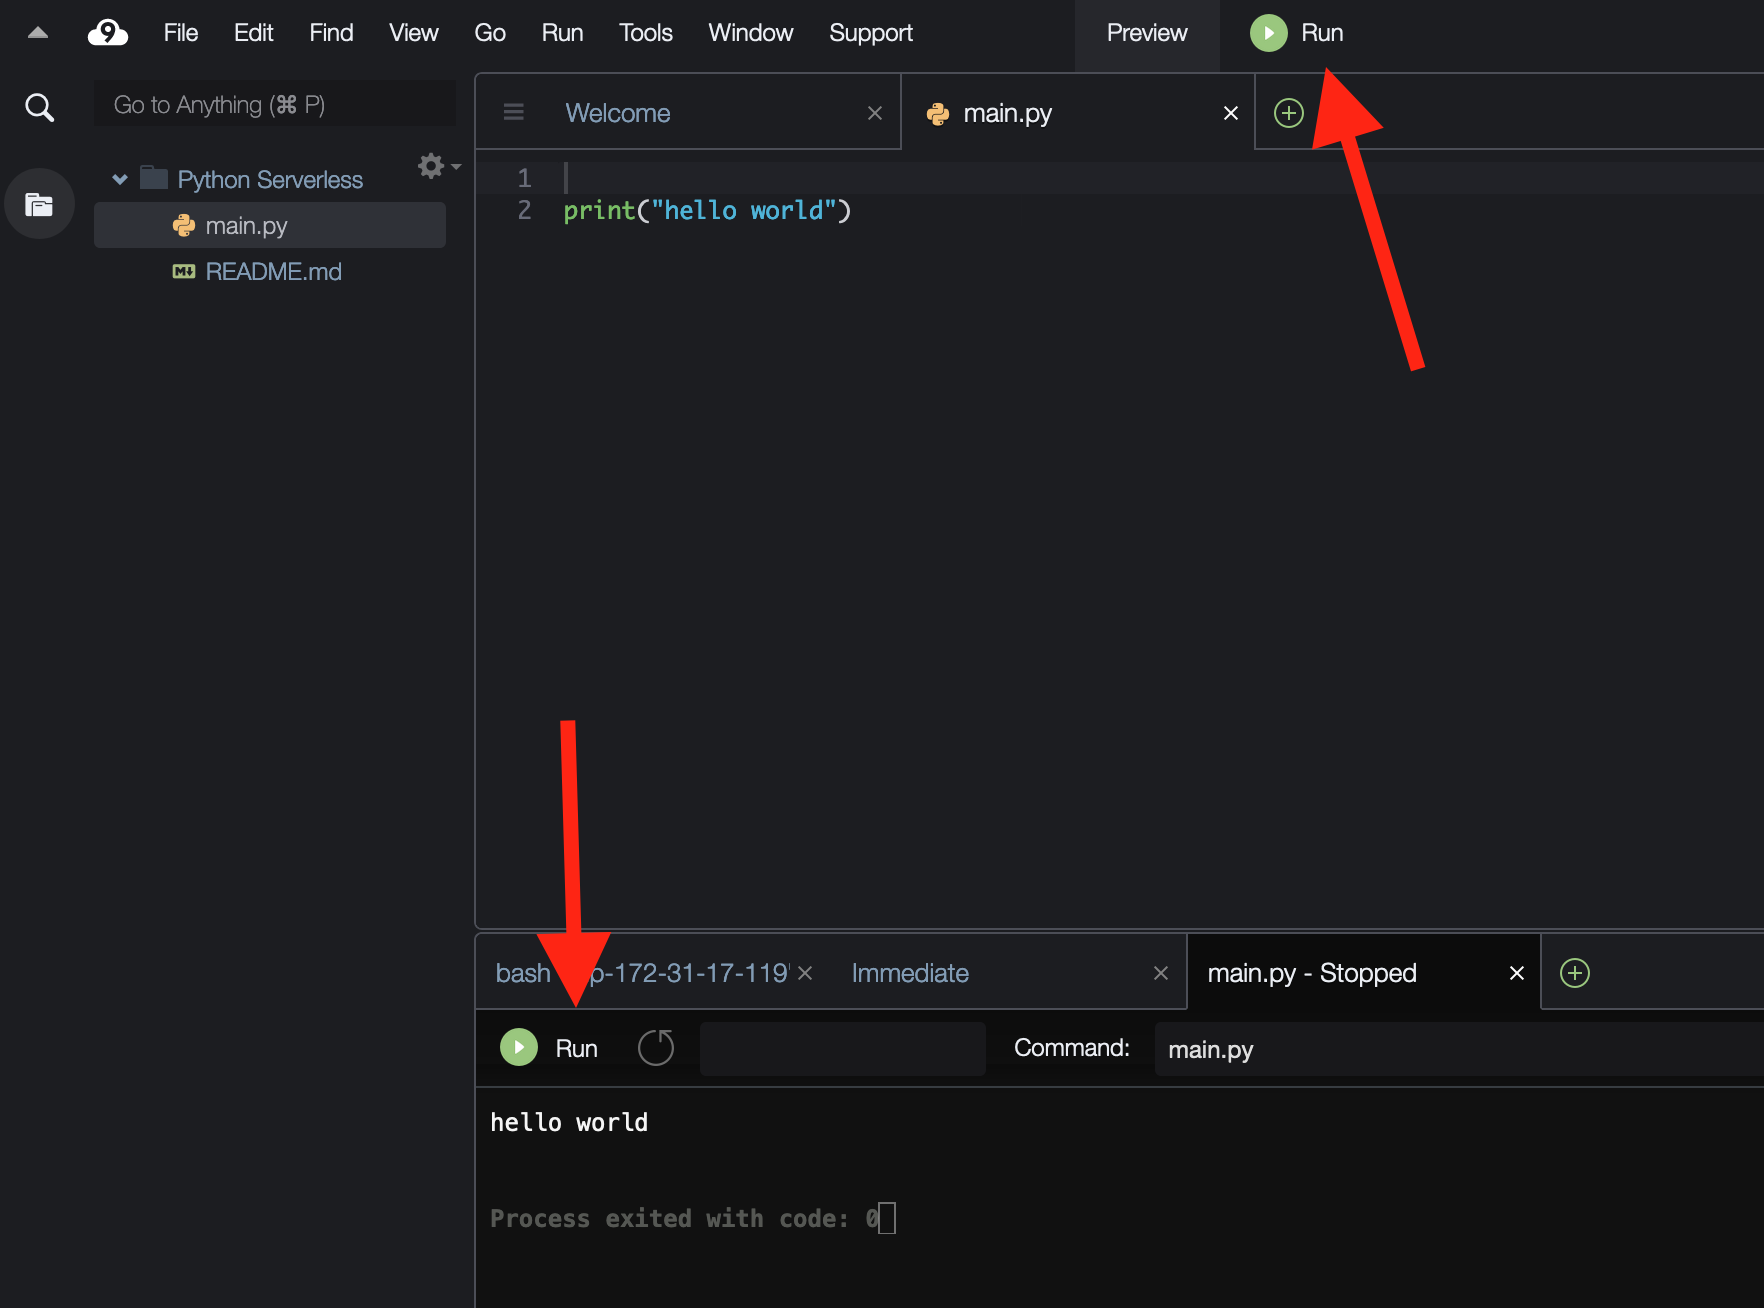
And finally, we are going to run this file on the EC2 instance that Cloud9 is running on (see image above) by clicking the green Run circle at the top.
Hello World (Serverless Edition)
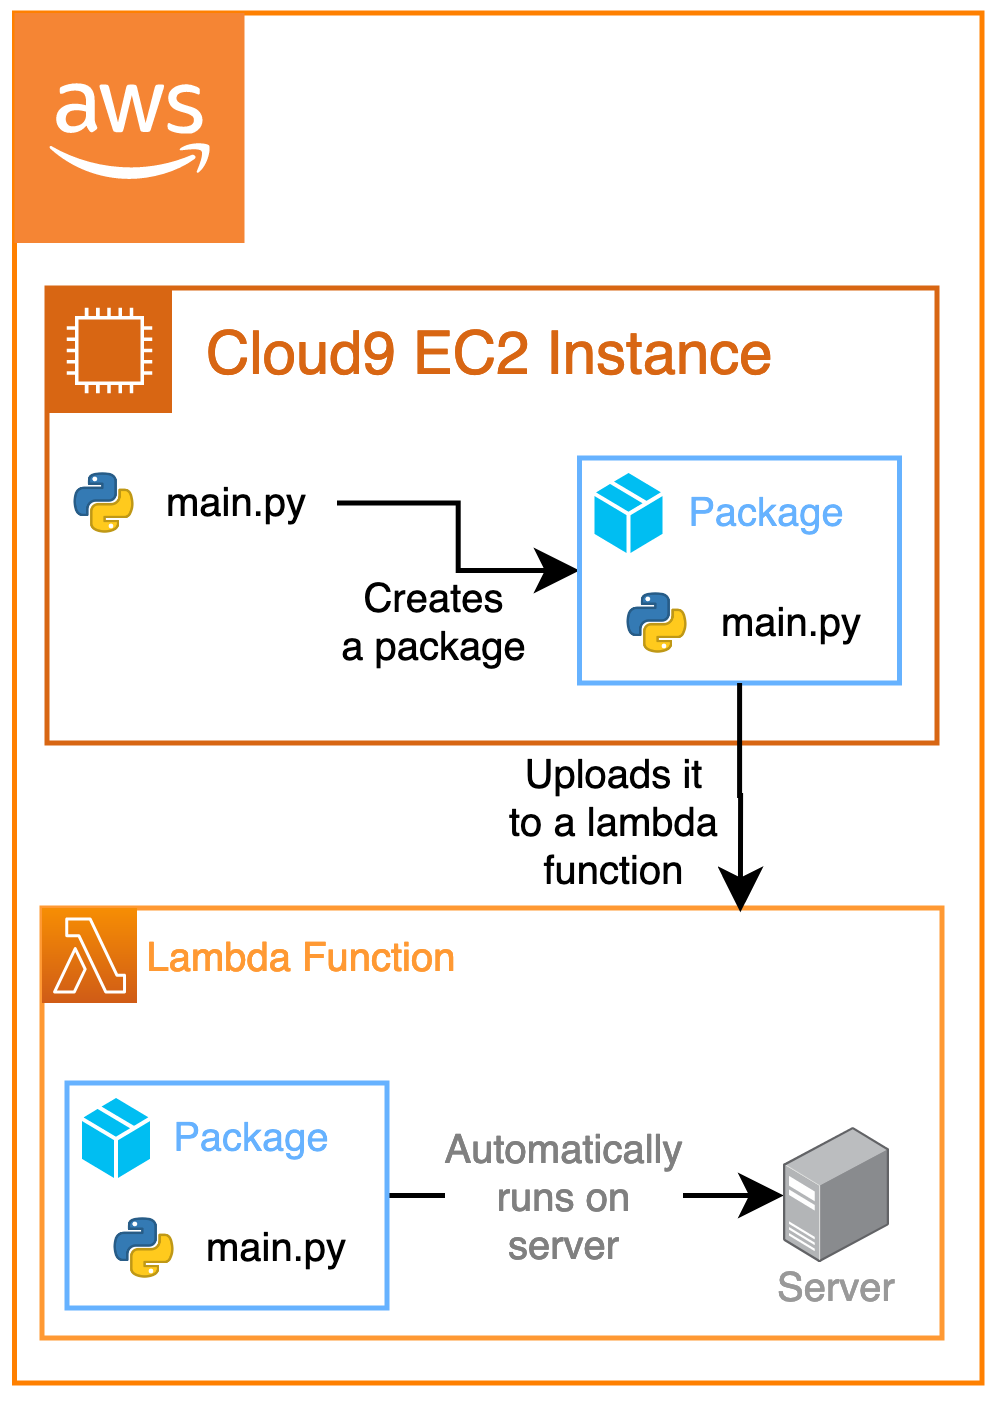
Since this is a tutorial about setting up our serverless environment, though, we want to actually make our “Hello World” run on what’s called an “AWS Lambda Function”.
A quick disclaimer: the following steps are not the fastest or most convenient way to go about creating an AWS Lambda function. Instead, they are to show you that there isn’t really anything magical going on when you use other tools (such as the serverless framework) to automate this process.
As discussed in my what is serverless video, “Serverless” isn’t actually a great name for this technology because, well, servers are still very much involved.
The difference is that in “Serverless” you don’t have to manage the underlying server computer, AWS does that for you. This allows you to focus 100% on your application code (the “package”), so you can provide real value to yourself and others.
So with that in mind, let’s head back over to the AWS Console in a new tab and navigate to Lambda

And press the orange Create function button in the upper right

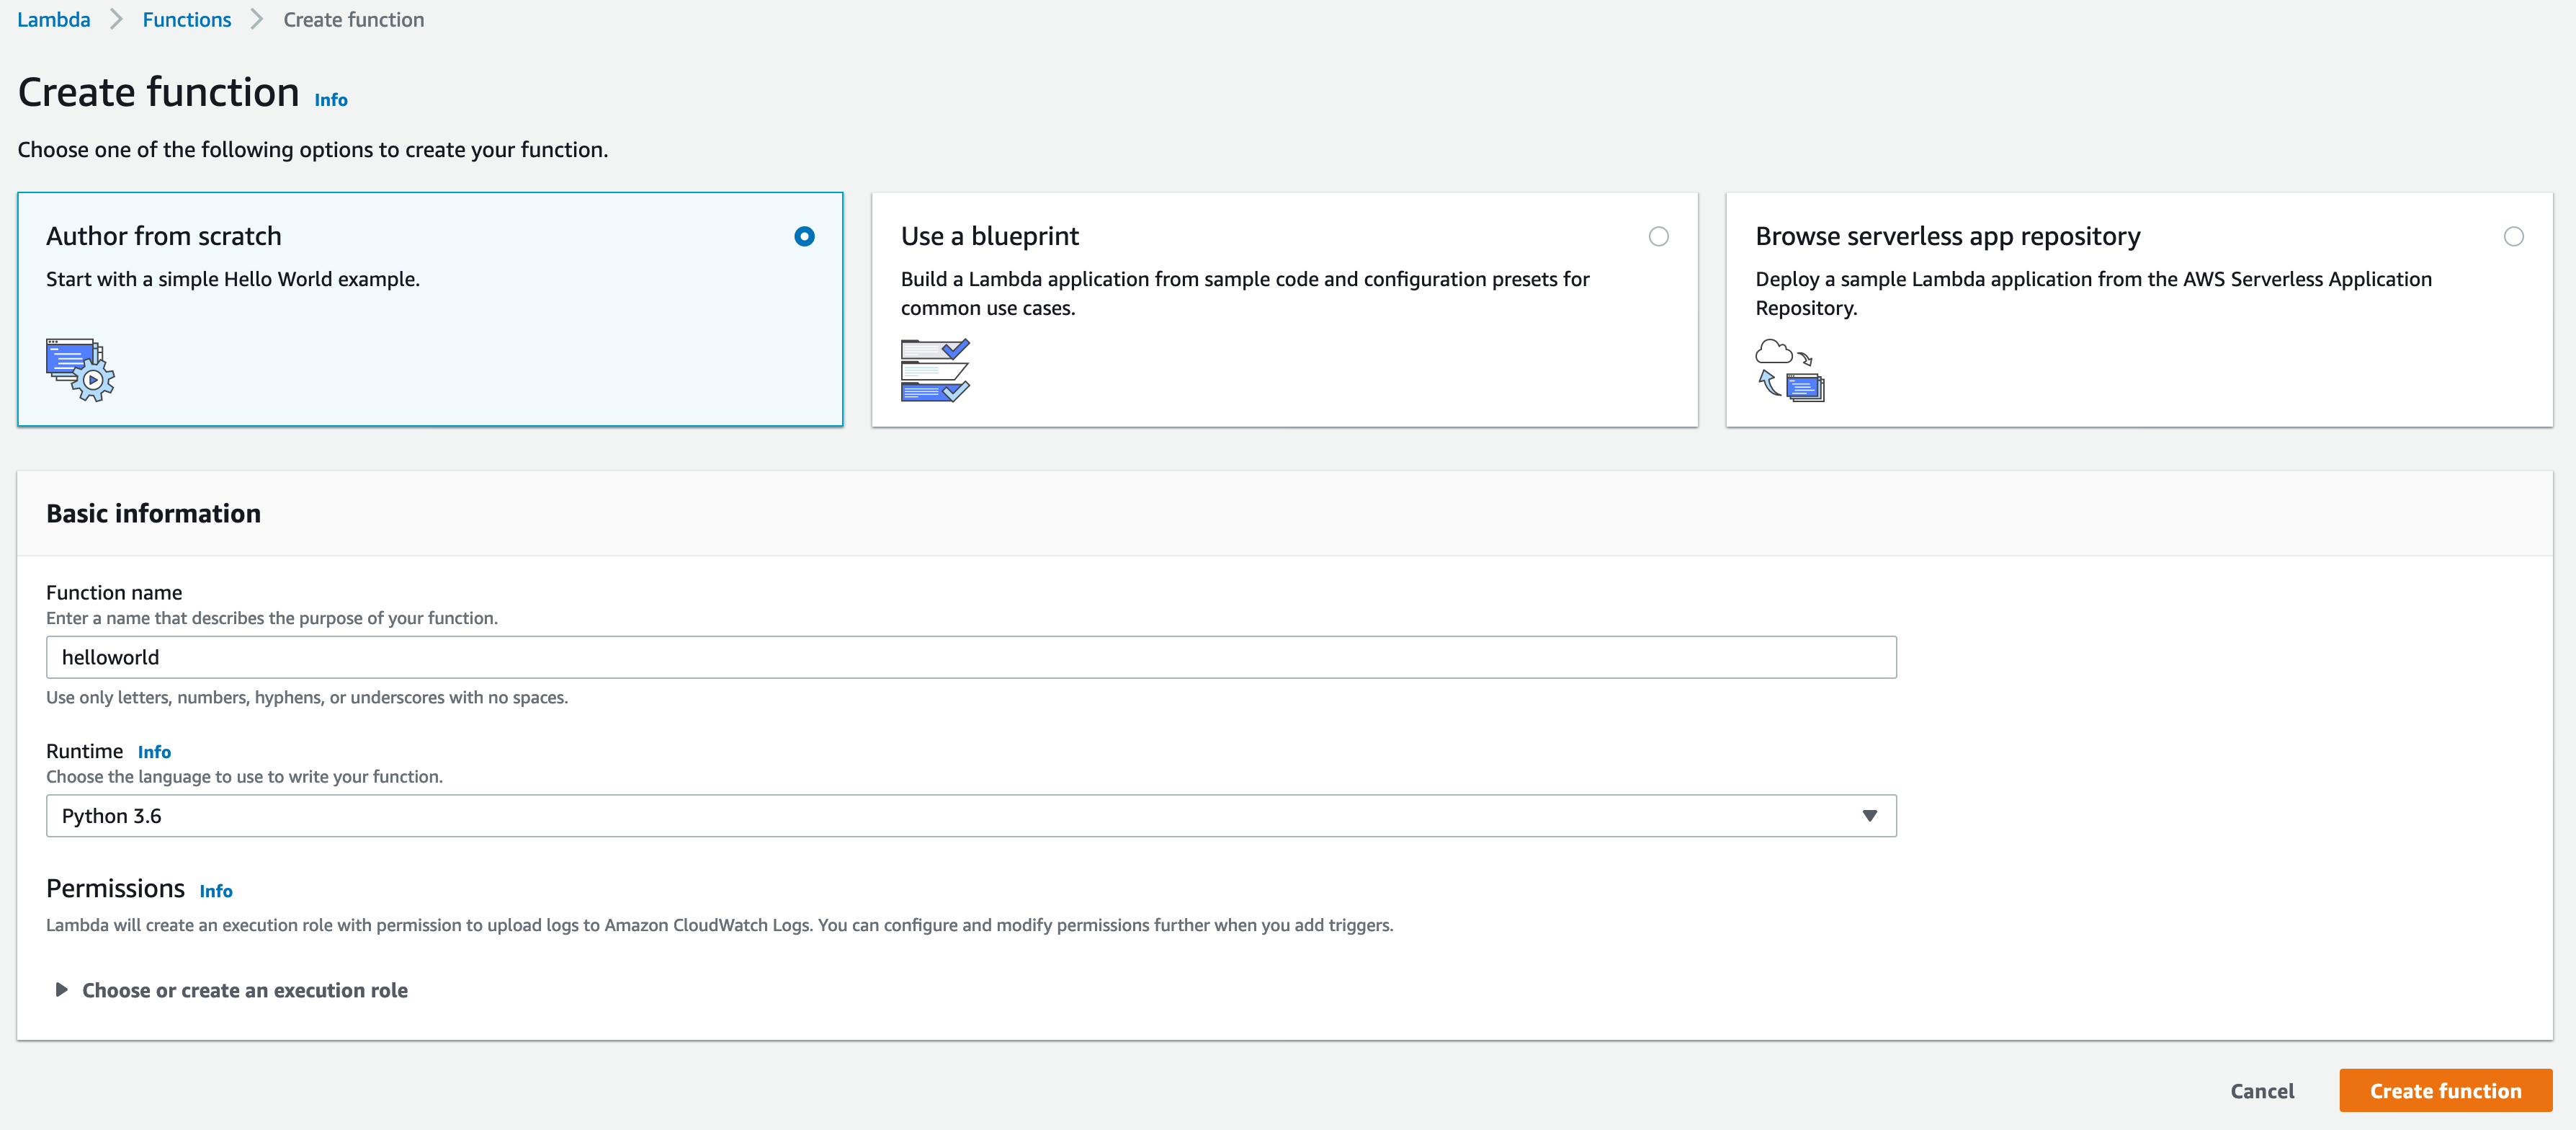
Name it helloworld with a Python 3.6 runtime and the default Create a new role with basic Lambda permissions execution role, and then press the Create function button to continue
After our Lambda function is created, we can head back over to our Cloud9 coding environment. Once there, we are going to modify our main.py file and add a function named hello_world so that Lambda has a place to call into our program.
def hello_world(event, context):
    print("Hello Beautiful Serverless World")
    print(event)
    return "Hello Beautiful Serverless World"

Now you may be wondering what the event and context parameters are doing there. These contain extra information that lambda gives to our program when it runs our program:
eventcontains information that we the programmer pass into our program when we run it (more on that in a minute)contextcontains extra information that AWS passes into our program (don’t worry about it for now)
Next we need to put our code into a “package” so that we can upload it to Lambda. As mentioned above, in this tutorial we are going to create it manually to remove the “magic”, but there are tools that make this much easier.
For Lambda, the “package” is really just a single .zip file that contains all of our code. To create a .zip file in our Cloud9 development environment, we can use the terminal and type:
zip <zip-file-name>.zip <file-to-include-1> <file-to-include-2> <file-to-include-3>
zip <zip-file-name>.zip \
  <file-to-include-1> \
  <file-to-include-2> \
  <file-to-include-3>
Or in this case:
zip helloworld-2020-07-06.zip main.py
zip helloworld-2020-07-06.zip \
  main.py
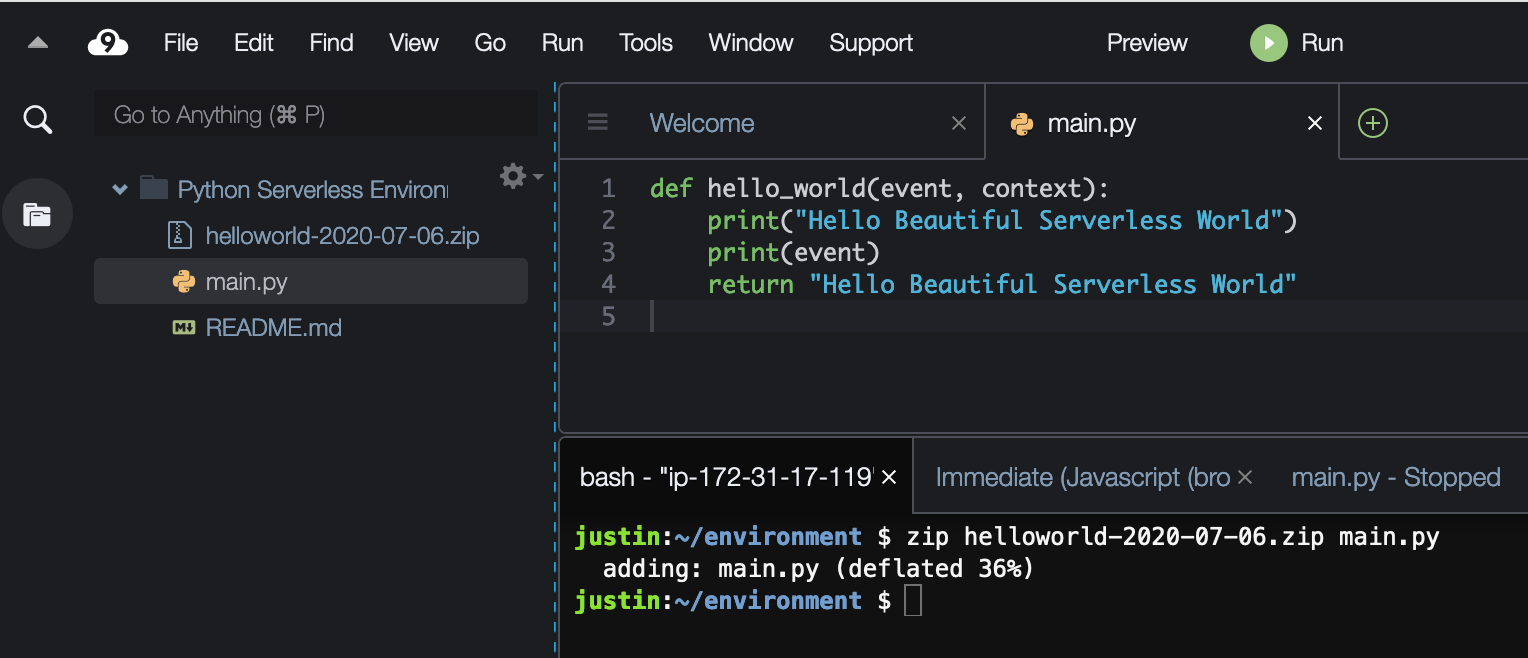
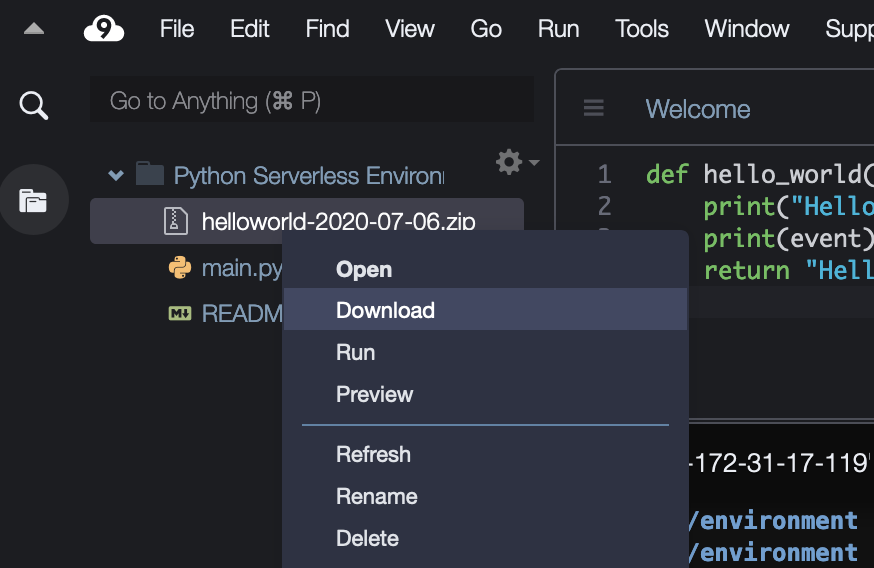
Next we want to download our .zip package to our personal computer:
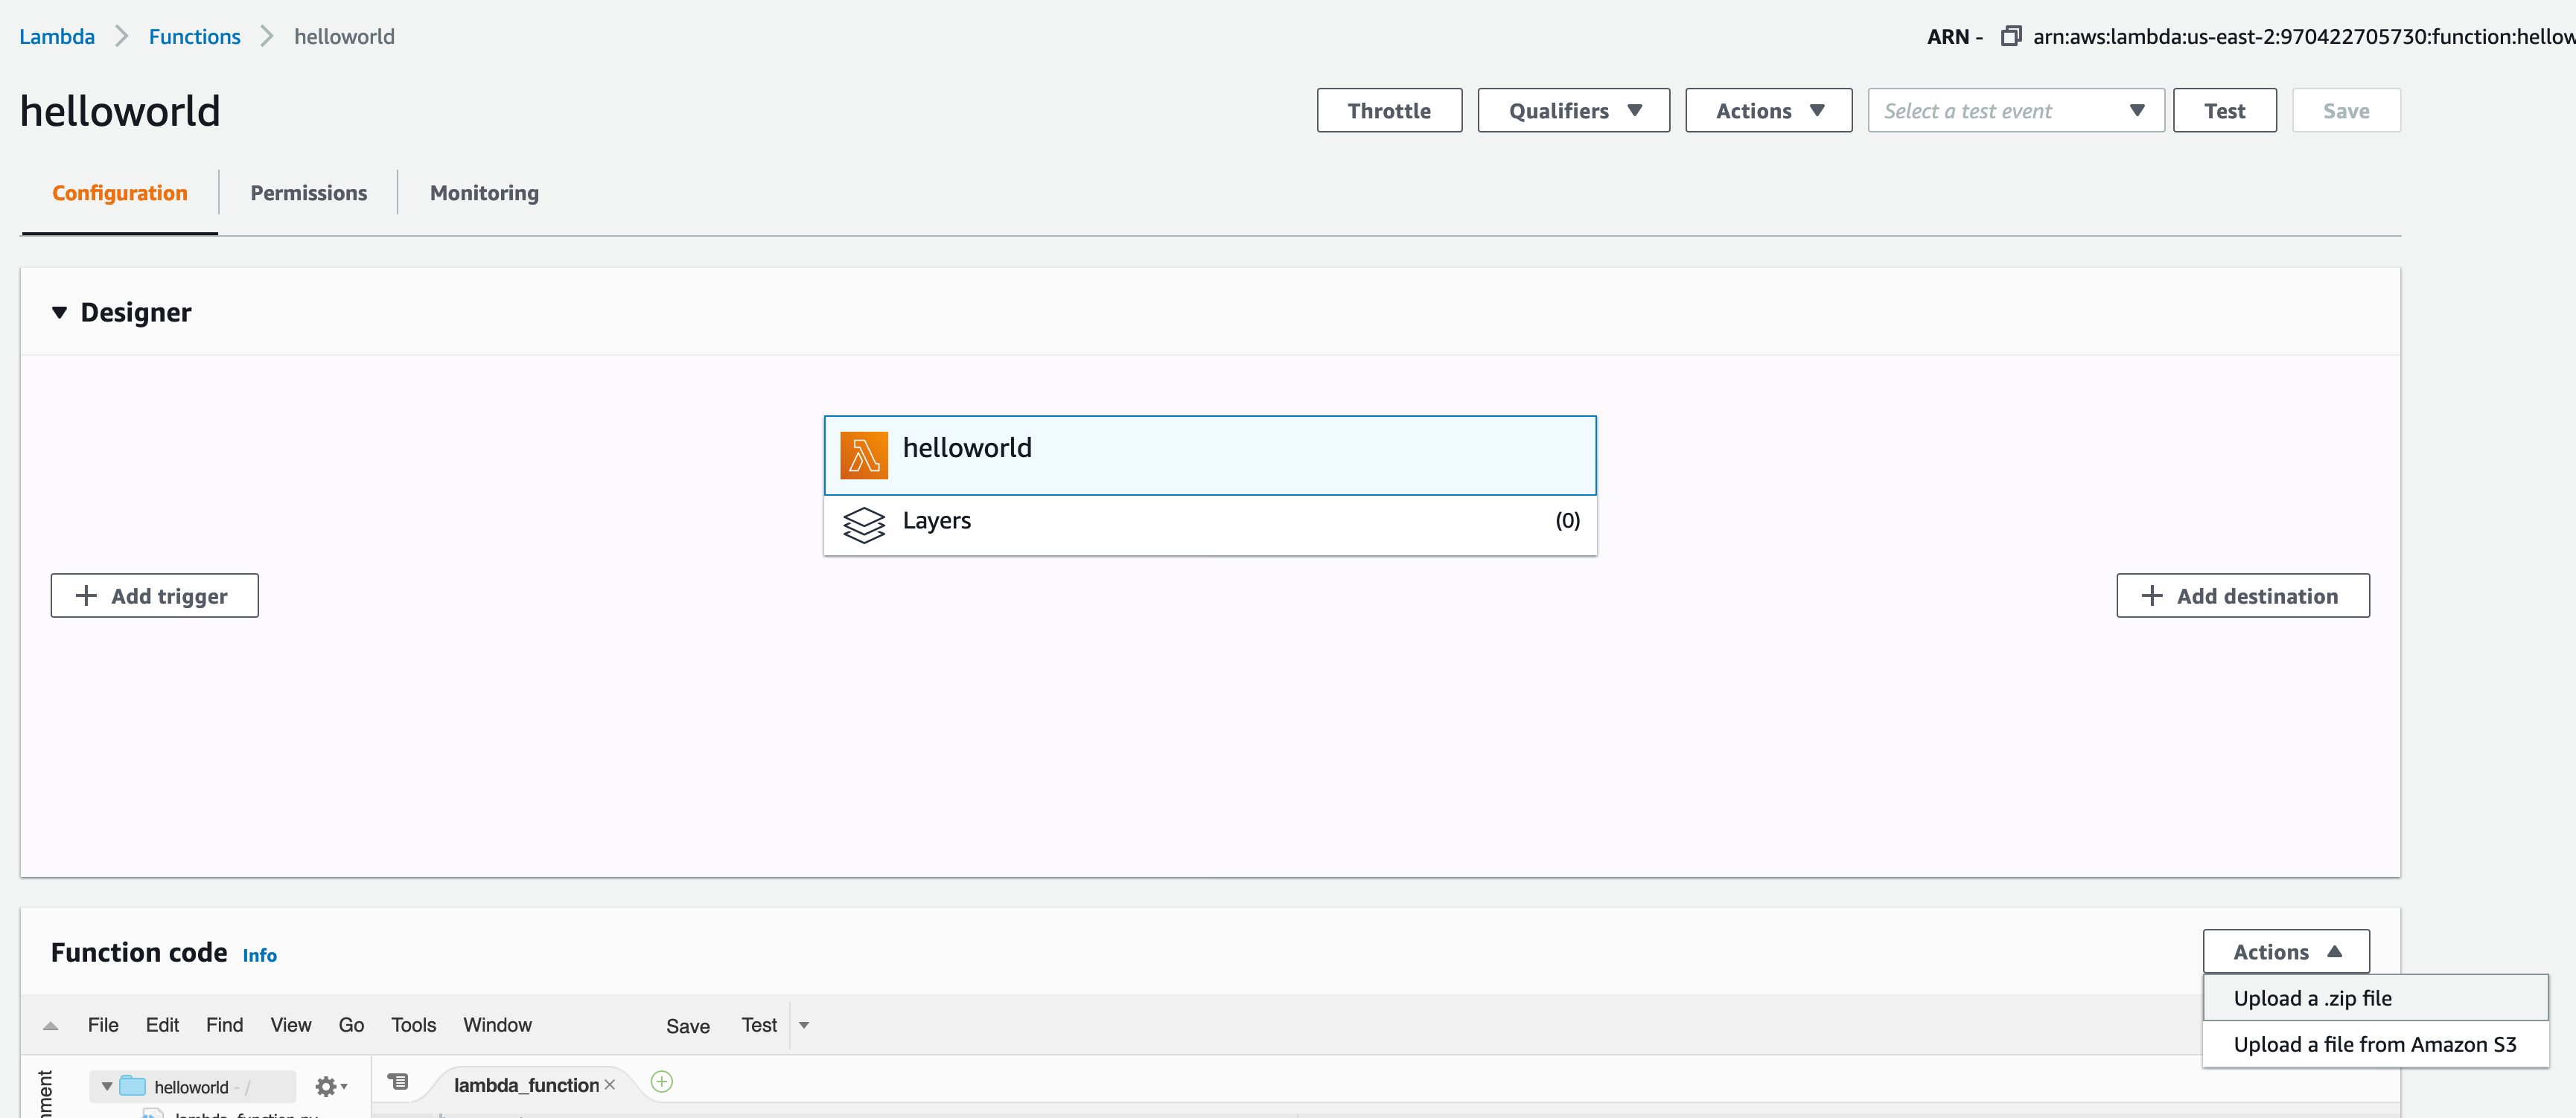
Now that we have our package, we need to upload it to the Lambda function that we created. Head back over to AWS Lambda and select Function code -> Actions -> Upload a .zip file
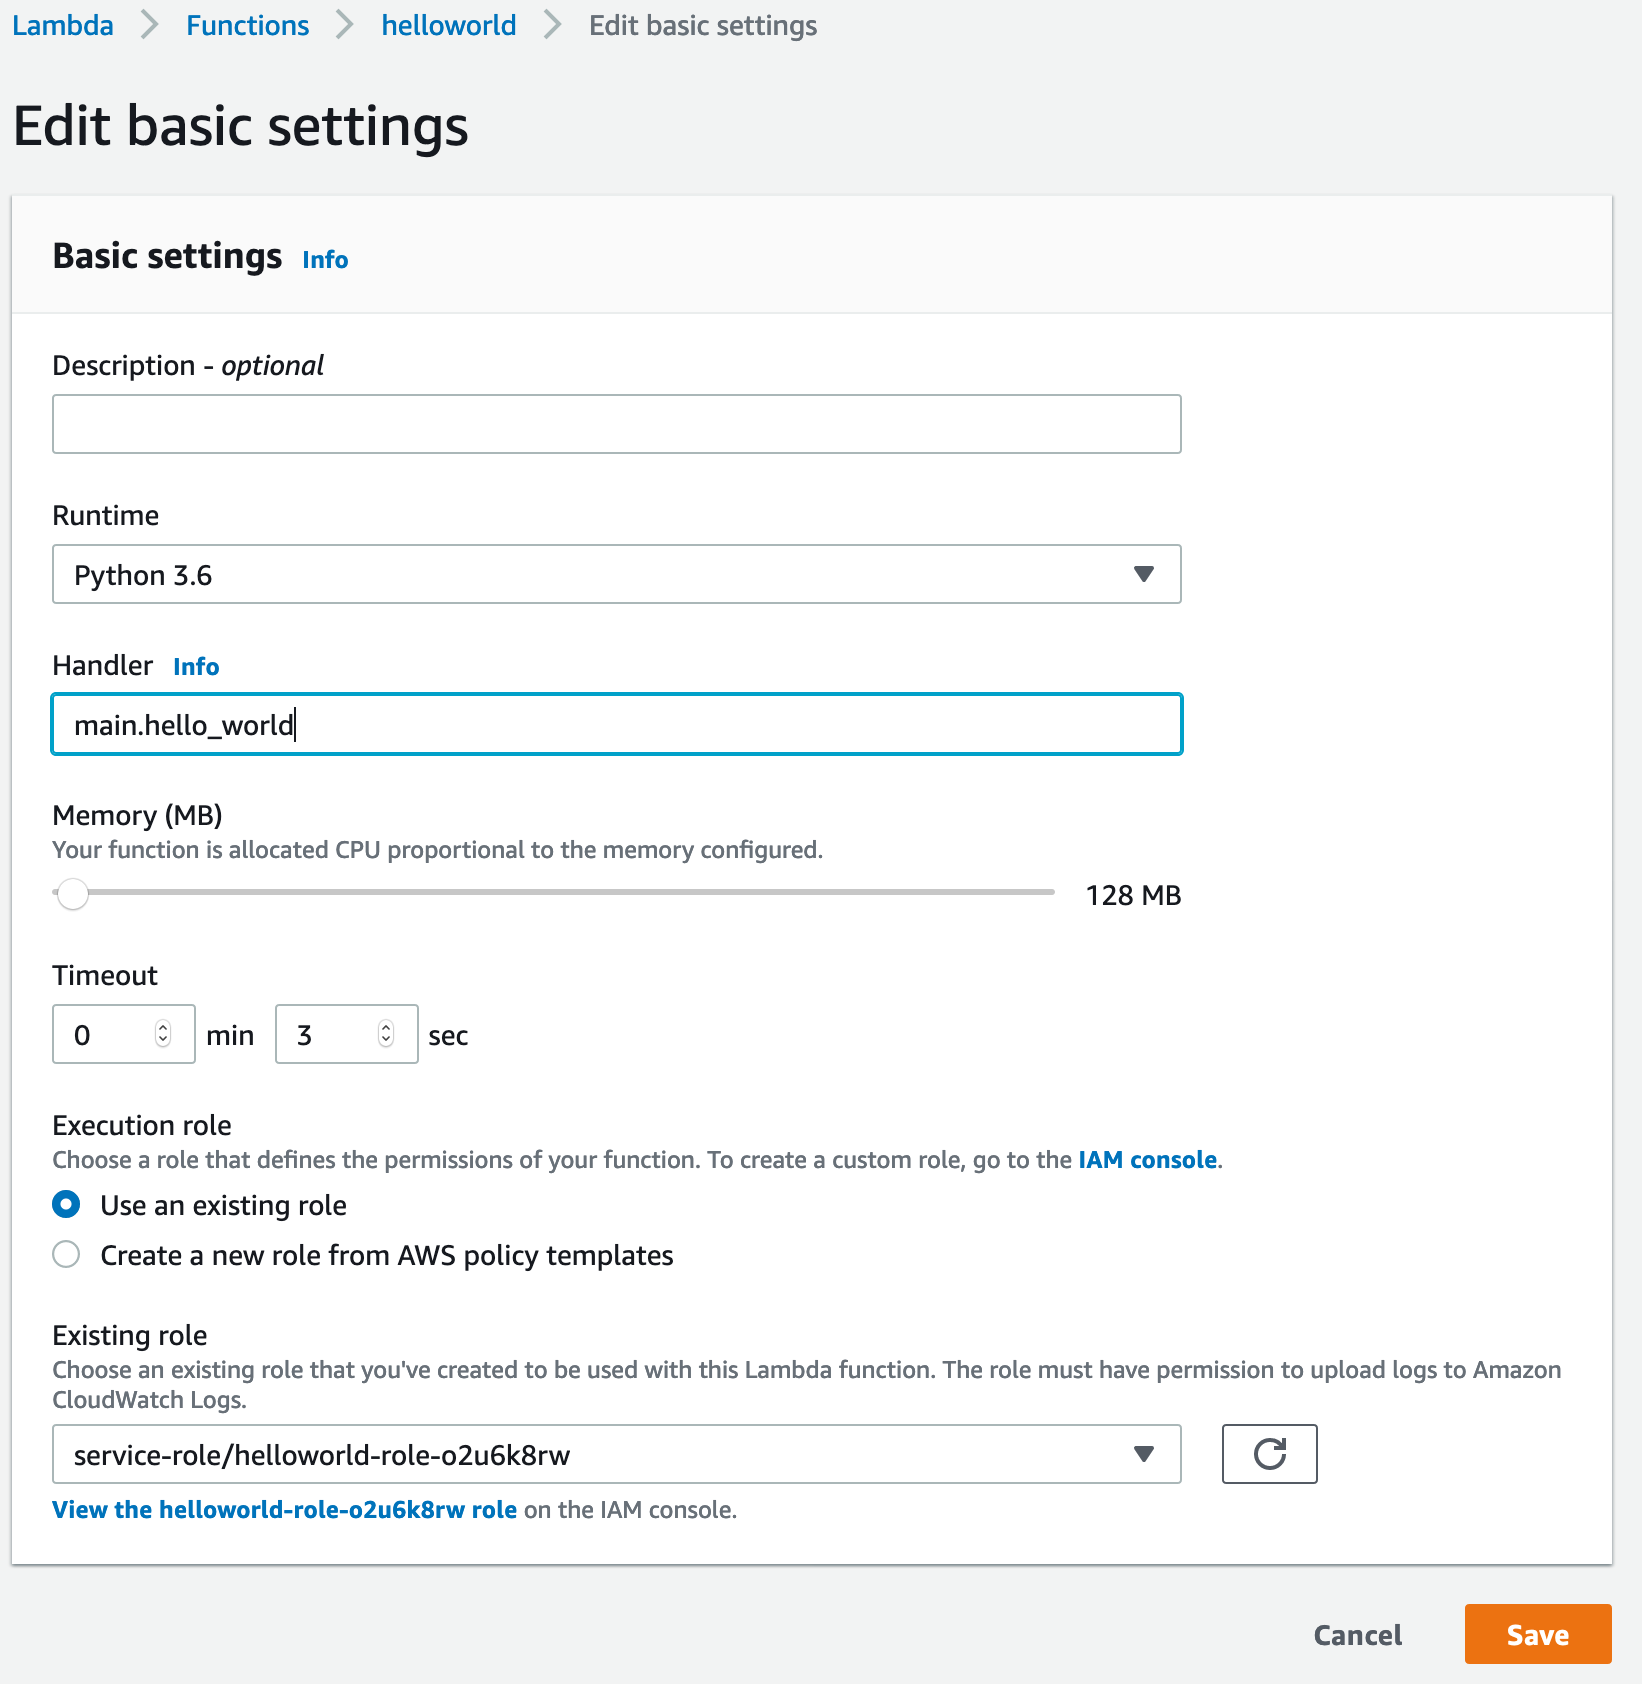
After our package is uploaded, we need to tell Lambda how to call our code. We created a hello_world method in main.py, so we let’s tell Lambda about it by editing our Lambda function’s Basic settings -> Handler with main.hello_world
And now we can run our lambda function. At the top, hit the Test button

Name our Event name as “HelloWorld”, leave the default input, and hit the create button
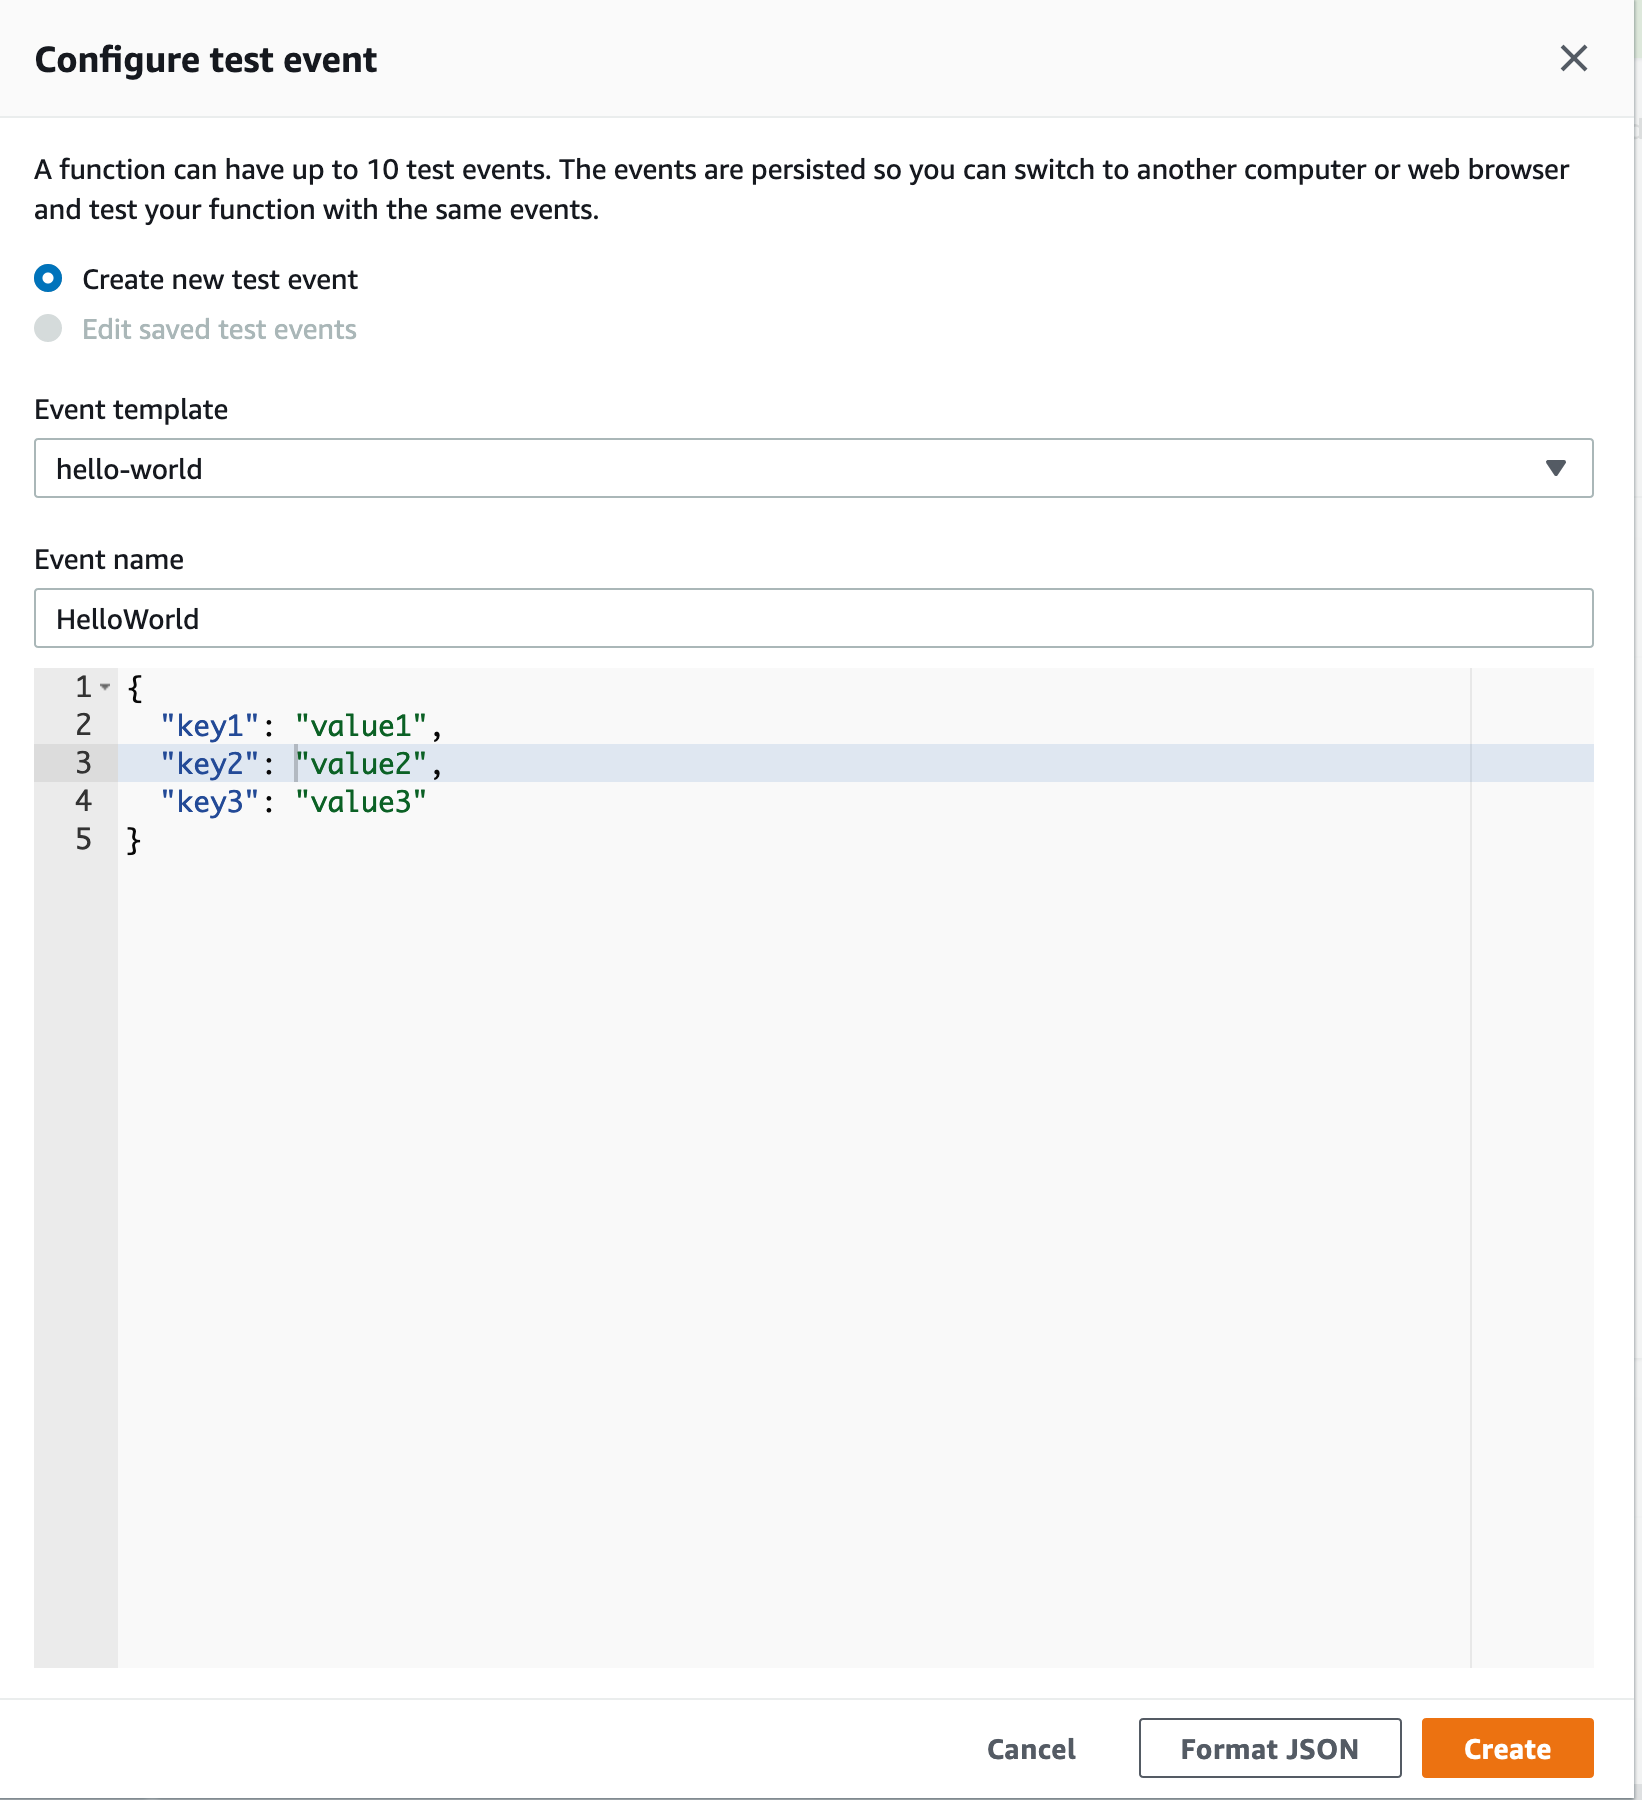
And lastly, hit the Test button again to actually run our lambda function with the HelloWorld test event that we just created.
If everything went well, you should see a green box appear with both:
- Our functions return statement:
Hello Beautiful Serverless World - And the print statements that we had added
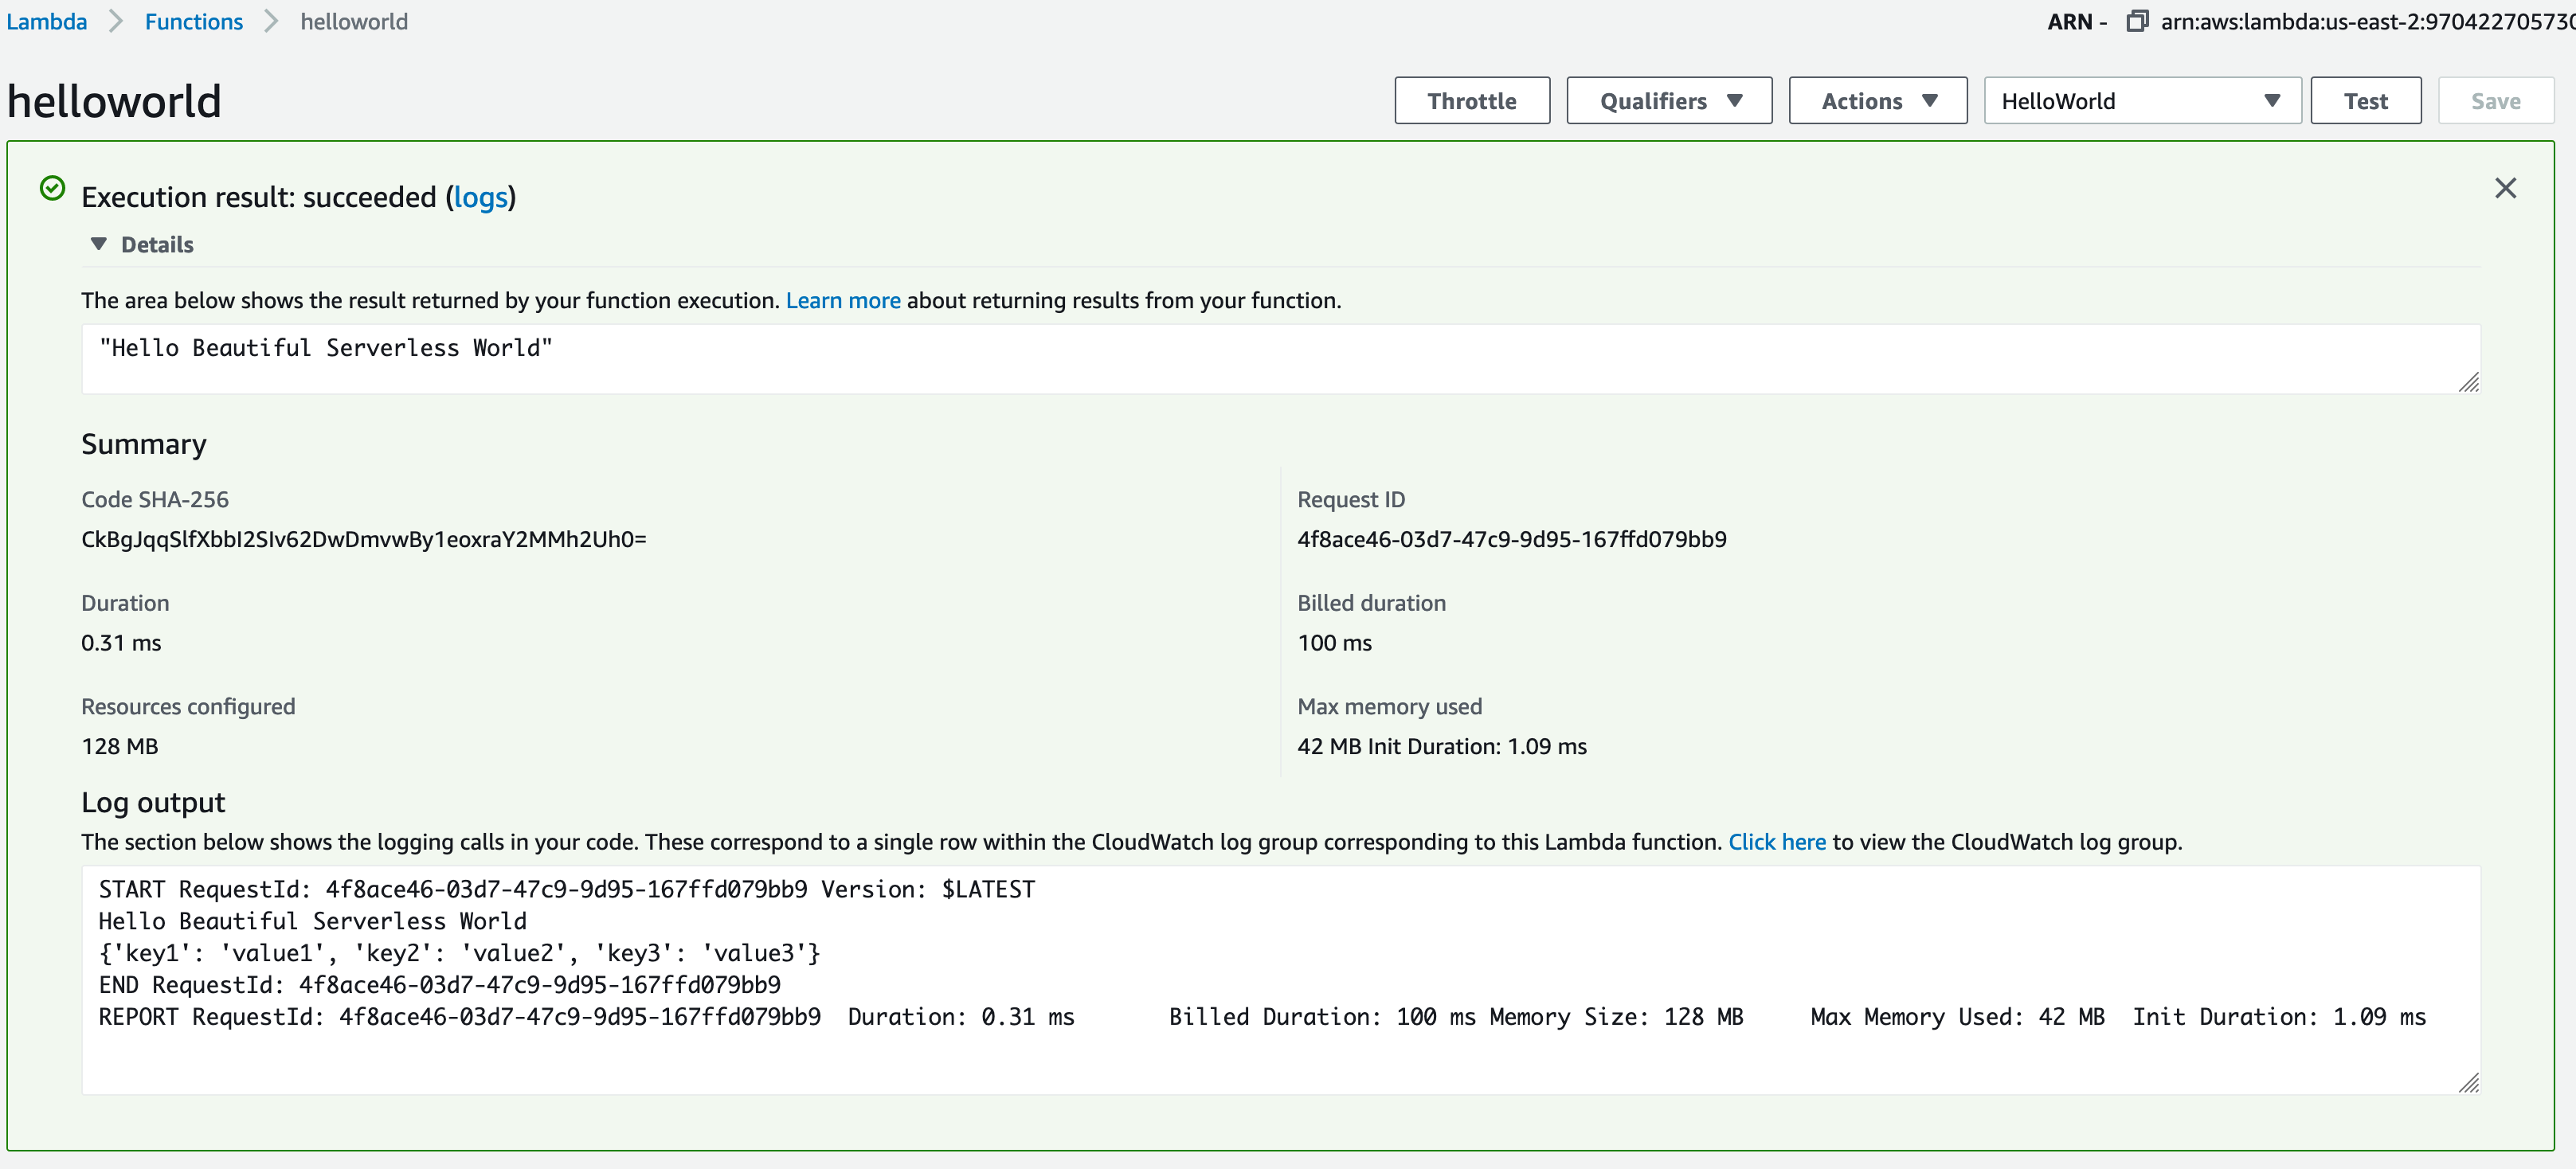
Notice how the “{key1: value1…}” corresponds to the “test” event that we created just a few moments ago. This allows you to send input into your program to use and modify it’s behaviour from.
Congratulations! You just created your first serverless app!
Underwhelmed? Still not really understanding how this is valuable? My next tutorial will dive into building an actual application with serverless so be sure to subscribe to my mailing list, but just to re-iterate why this building block is essential to advancing your programming skills:
Your code is now running on a server computer in the cloud. Your laptop could blow up tomorrow, but your program would still be runnable on an AWS computer by anyone who could click the button
There are other much more user-friendly ways to “click the test button” (such as from a website or from a slack/email client) which we’ll dive into in the next tutorial (no, not everyone needs an AWS account to run your program)
Many different people could run our python program at the same time, anytime they wanted – and all getting value out of it
Other Considerations
Hopefully this article helped you get up and running with your serverless environment, but I also wanted to mention some other advantages, disadvantages, and considerations when using a Cloud9 development environment.
AWS gives you “750 hours” of free t2.micro / t3.micro server time (“compute”) a month, for the first 12 months of opening your AWS account. Now, this may sound complicated (it is), but what this means is that you can have a single Cloud9 development running for free for the first 12 months of opening your AWS account (as long as you don’t start any other EC2 instances).
Cloud9 development environments, by default, shut down after 30 minutes of inactivity. Since EC2 instances are billed by the minute, this means that if you developed on a t2.micro instance (billed at $0.0116/hr) for 8 hours a day Monday-Friday it would only cost you $1.86 / month (if you don’t qualify for the above mentioned free tier)
Your development environment can be accessed from any computer with an internet connection, instantly. Traveling between work and home? Want to program using the computer at the library? Visiting relatives for the holidays and don’t want to carry your computer with you? No problem!
Cloud9 also supports multiple users at the same time, allowing you to collaborate with other colleagues and other students in real-time (which can be especially useful in these pandemic times)
Cloning and backing up your environment is as easy as clicking a button
Larger EC2 instances with more RAM and CPU can be a little pricey, though I’ve found are needed far less frequently than I would have previously assumed
Next Steps
If you’re new to the world of AWS and/or programming, you’re going to want some help lest you end up lost at sea in the Google and StackOverflow ocean of information.
Subscribe to my mailing list for more tutorials to turn yourself from a python beginner to job-ready with serverless.